Saving money on a Tado subscription
I use a Tado thermostat to turn off the heating when I leave my home. This is great and saves me some money on heating, but it’s also a premium feature that costs me €3.99 per month.
This annoys me very much. So, let’s have some fun creating an overly complicated solution.
It would be very easy to use the Tado API or Home Assistant and run it on a Raspberry Pi or other small and efficient hardware in my home network. However, I don’t have a spare Pi or any tiny client lying around, and they’re not free:
- Buying a Pi: €40+ for an older model
- Running it continuously: €1.30 per month (massive, I know)
What I do have at home is an older model MikroTik router (RB2011UiAS-2HnD), which I use as a gateway after my Ziggo modem. I also use it for simple firewalling and NAT rules to ensure my entire network uses NextDNS by redirecting UDP port 53 (looking at you, Chromecast, which always tries to use Google DNS at 8.8.8.8). These MikroTiks are great for homelabs and home networks, offering a wide range of features at low prices.
After a firmware upgrade, this router now seems capable of running containers. Although that’s kind of awesome, I don’t think my router has enough resources to properly handle this workload.
So, now what? Link to heading
Let’s run Home Assistant in the cloud on the cheapest VM I know.
The cheapest cloud vendor I know is Hetzner, so I rolled out an Ubuntu instance and immediately installed K3S on it to have something to work with. K3S already includes some features to help you hit the ground running:
- A local path provisioner for PV
- A local IP load balancer
- An addons kind to deploy applications using simple manifests
- A Traefik ingress controller
Using these tools, I deployed ArgoCD, which I then used to deploy Home Assistant, Cert-manager, and ExternalDNS.
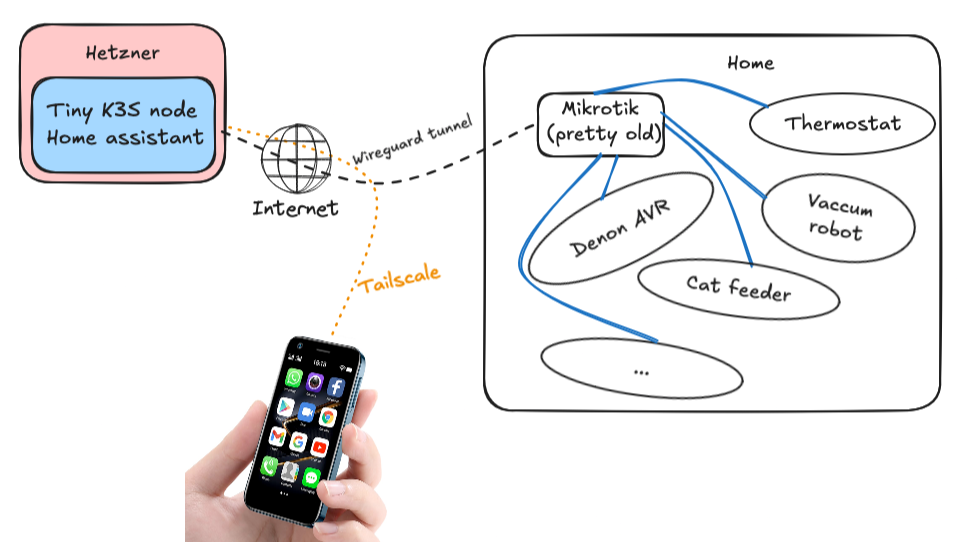
Connecting my home network to the VM Link to heading
Easy—using a WireGuard tunnel, which is by far the best and easiest VPN solution I’ve ever used for site-to-site tunneling. My MikroTik didn’t support WireGuard before the recent firmware upgrade, but after the upgrade, I had a tunnel up and running within minutes.
WireGuard Tunnel Link to heading
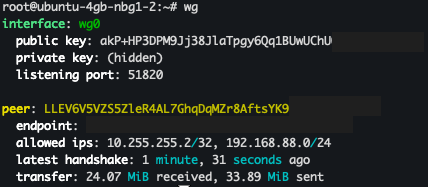
After adding some routes to the MikroTik routing table, my home network could reach the Home Assistant installation on Kubernetes and vice versa. The last thing I needed to do was ensure my phone, with the Home Assistant app, could also access the installation. I achieved this by adding the VM to my Tailnet using Tailscale.
And there you have it! Link to heading
Home Assistant is now able to turn off my heating when I leave the house.
And my grand savings from doing this? Link to heading
- Tado: €3.99
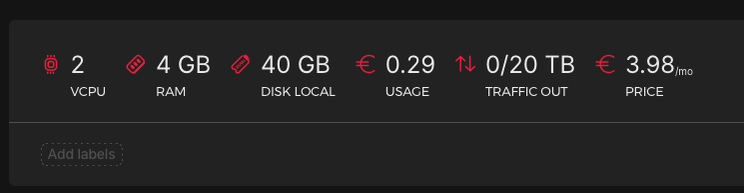
- Hetzner VM: €3.98
A whopping 1 cent. I saved €0.01! I’m so proud of myself, I’m going to invest that cent every month. Of course, the VM probably uses more electricity than I’ve saved, but let’s not think about that too much…